3 Rope System
A Back-up System for Arborists
This article was commissioned by ODSK
Since the 1980’s it has been commonplace to learn climbing techniques with two ropes. Though nearly identical, one is long, the climbing system, and the other short, the lanyard system. Both systems are used for climbing upwards toward the anchor point. The climbing system is used for long movement around the tree, the lanyard system for stabilizing work positions. Traditionally the climbing system would be a moving rope system (MRS), meaning that it would be attached (anchored) to one part of the tree. The systems belay component is attached to the harness via a rope bridge or separate parts of webbing at this area. The lanyard system, while identical in parts to the climbing system, is used to hold the climber in a position; while standing on spurs, or performing a work task like passing the climbing system to a new part of the tree, or cutting a branch. The lanyard system is often attached to either side of the harness and used horizontally. The climbing system is ordinarily anchored at one point and transports the climber to different parts of the tree. The lanyard system holds the climber in position to perform a task.
The nature of trees and the two climbing system technique means that climbers work position from pendulums. The lanyard is typically used to stop the climber from swinging back to a vertical position underneath the anchor.
Common teaching practice requires that an Arborist use two points of attachment while performing a task, ie the climbing system and lanyard system. Both must be attached to the tree before performing a task, for example, cutting a branch. Some guidelines state that the second point of attachment must be load bearing. This is contentious because the further the climber moves along the branch, the weaker it gets and the less able it is to support the climbers weight.
The two rope system has been tried and tested for forty years, in America, UK and Europe. There have been many technical developments within the friction components of the system. Rope technology has moved forward considerably, as well as detailed user techniques. But it remains what it always has been, a single rope attached (anchored) to one branch in the upper part of the tree (climbing system) and one in the work area (lanyard system), ie a two rope system.
Moving Rope System (MRS)
The MRS system is simple in application. Having the Working End at hand, ready to set and retrieve the system is convenient. This is simple and easy for beginners to understand.
Although it takes a lot of rope in the system to do so, that it can be rigged in a ‘V’ between two anchor points is also convenient.
There are benefits in a rescue situation too, if it is passed through rings or a pulley at the anchor point.
Difficulties of the system lay in:
Setting an anchor from the ground.
Friction management at the anchor.
The mechanical assist (2:1) often leads to misuse of the leading arm (short and long term physical damage)
Standing end management (long length).
Length and weight of the line.
Redirection of the pendulum.
Using the system between multiple trees.
Stationary Rope System (SRS)
In its most simple form SRS passes the line over one or many branches (anchors), is tied off at floor level and then used. While in use the climber may pass their rope over as many additional redirection points without friction affecting the belay system. The simplicity to access a tree in this way is unsurpassed. And if redirects are kept to a minimum (approximately two), it will retrieve easily. Rope management of the standing end in a MRS can be fatiguing for the climber and ground worker, SRS’s allow the standing end to be tailored in length to the tree height/task.
SRS is similar to MRS in that it is a two rope system; using one climbing system and one lanyard system.
A ground based anchor is not exclusive to SRS but it did popularize it. There are positives and negatives when loading an anchor in this way. A line tied at ground level may add in the support of additional points around the tree (multiple compressive loading)so that the climber does not relay on one branch as their life support. But, subsequent vector forces must be carefully checked as there is potential to load the tree:
In force multiplication
In its weakest loading direction (tensile loading)
Difficulties of the system lay in:
Tying the fall of the line at the ground (bottom anchor) means that if cut the climber will fall. There is unquestionably a high risk of the line being cut by; the climber, the ground worker, falling branches/log wood.
Tying the line at ground level should not be misconstrued as good rescue practice. If anything, it is poor rescue practice.
An SRS tied at the top of the tree (top anchor) must be thoughtfully rigged to retrieve.
With MRS and SRS use of a two rope system leads to some management difficulties: How strong is the anchor point? How wide and steep can a pendulum be safely used? How much force is being applied to the tree as the pendulum angle increases? When does the system transfer from ‘safe’ toward ‘dangerous’? When should an additional climbing system be used?
While there are multiple ways to gain additional stability and to back-up anchor points, this article proposes one practical idea (3 rope system) that beginner and expert can use in order to climb with extra stability and back-up’d anchor points.
The building blocks of the 3 rope system use SRS. It incorporates the easy setting of a bottom anchor with the safety of a top anchor. Both access and safe working are easily achieved. Redirection of the pendulum on SRS is the most simple because it does not need equipment. Both the main line and work positioning line can be easily redirected. The main line and work positioning line suspend the climber from two points.
The work positioning line can be redirected into the outer portion of the tree, giving the climber a stable work position anywhere between the main line anchor and work positioning line redirect. The climber is able to unclip one system while maintaining safety on the other. (This is used for passing branches and setting redirects.)
Additionally, using the lanyard suspends the climber in three dimensions.
The system is retrieved from the ground.
Important Points
Ease of access with a bottom anchored SRS.
A bottom anchor allows the climber to build redundant natural anchors into the system.
Security of using a canopy anchor.
Ease of redirecting the pendulum on a SRS.
Work positioning stability because the work positioning line and main line can oppose themselves.
Ability to climb inside and outside of the branch network. Natural redirect points are easily rigged by passing one system over a branch while maintaining a life support point on the other.
System retrievability.
Technical Guidance
Throwline and bottom anchored systems.
A throwline is a tracer line, usually 2mm in diameter and has a small weight tied to the end. It has the perfect balance of weight and power and with some practice a climber can throw up to 30M’s in height. Obtaining remote anchors is an unusual practice, I can not think of any other ‘at height’ discipline that set their anchors remotely (from a distance). Maybe Ninja’s? Arborists have perfected this practice.
Throwing with height and precision is not an easy thing to do and there is always an important factor at play; how strong is the branch (or branches) that I am choosing to use?
When choosing anchors I keep in mind these simple rules:
Does the tree look healthy?
Is the anchor conveniently placed for me to safely and easily do the task?
Is the branch upright, diagonal or horizontal? Upright is best.
Is the placement and/or tie point going to create a detrimental lever effect on the branch attachment?
When possible use more than one branch in order to share the load.
Check the placement from more than one angle and ask a team mate to confirm it.
Once aloft a climber commits their life to these decisions. As a rule please aim for a lower (stronger) branch for access, then choose the final anchor while up close.
Once a good anchor has been secured by the throwline, using SRS is the most simple and efficient way to access into a tree. The rope can be tied at the bottom in various ways, the most simple being a Running Bowline.
It is very important that care is taken with the placement of the anchor leg. A bottom anchored system inputs a levering effect on the branch. If the rope is set or tied incorrectly the branch may be loaded to breaking point, even if strong enough when set correctly. Take care to set and tie the system so that when the climber is on the rope their force COMPRESSES into the tree. (There is a more detailed explanation in the Safe Anchors article.). Also of caution, beware that a chainsaw hanging from a harness does not come into contact with the anchor side of the system as a rope under tension severs easily.
Knot Blocking Ring and Ring (Cambium Saver)
All tree climbers have used this ubiquitous tool. It has a very interesting history, coming from France, where a ‘Figure 8’ belay tool was cut into two pieces and a loop of webbing girth hitched onto each. Because one ring is LARGE and the other SMALL an overhand knot tied into the end of the rope was able to retrieve the items from a distance. The knot passing through the large ring and catching against the small one, then pulling the whole thing out of the tree. It became an indispensable tool for looking after the life of both climbing rope and tree. The other name for this tool is a Cambium Saver because it stops the moving rope from damaging the important cambium layer beneath the trees bark.
The original sized rings are outdated for modern techniques. SRS climbers tend to use much smaller rings, (that you can find on Teufelbergers ‘Multi Saver’). The reason that they are outdated is because SRS climbers like to use a technique called Knot Blocking. A Moving Rope System (DdRT) passes the Working End through the rings and attaches it back to the harness. The loop of rope is captured in the rings. An SRS system passes the Working End through the rings then blocks an Alpine Butterly against either the small or large ring. If the large ring is too large the knot will slip through and the climber will fall out of the tree. Take care of this point.
If you have the ability to splice and make your own Cambium Saver then choose a large ring that is no bigger than 34mm. This will allow you to safely knot block an 11.5mm rope against it.
I use two large rings plus a retrieval link. It seems to work well for this 3 Rope System.
Climbing
Tree climbing is best described as rope climbing. For the purpose and ability to reach the (weak) ends of branches, the climber moves along a pendulum of rope in a series of circular motions. This transfers the climbers weight along the rope and into the part (or parts) of the tree where the rope is anchored. Tree climbing is akin to playing on a swing. A swing whose length changes as and when the climber needs to move between different parts of the tree.
Tree
A tree is a series of reiterating shapes, one connected to another from root to sky. Vibrations are able to pass from one part of the tree to another, even when the structure is very large and the vibrations are small. This helps to dampen shock loading caused by wind. If fine branch material is removed (bad pruning or badly ordered removal) the tree becomes more prone to failure. Trees are made strong through millennia of physical and biological evolution and wind (movement) is a crucial part of this. Trees are made up of reiterating shapes but should be viewed as a whole system. And one tree should be viewed as one part of a much larger forest system.
While it is imperative to set and maintain a robust and static like connection point for the MAIN LINE, we can use the trees impressive ability to absorb shock and pressure when rigging the WORK POSITION LINE.
Compression
Because the climber aims to always maintain tension in their rope this has an immediate effect on the place where the rope is anchored. If the branch is long and thin and the climber pulls perpendicular to it this has an obvious effect of movement towards a breaking point. How much they are able to pull in relation to the branches inherent strength and flexibility must be studied by the climber. The longer a lever is the less effort it takes to move it. Likewise, the longer a branch is the easier it is to snap. But a long branch when loaded with force along its woody structure shows mind boggling strength. And because of this even a thin horizontal branch may be used if loaded correctly.
A tree in springtime when it is pulling water up into the wood is quite different (flexible) from deep winter when whatever water is left has turned to ice (brittle). Trees react to environmental factors and we as climbers must build up a knowledge of those things.


Example
This is an example of how a climber could anchor and use the 3 Rope System. While this example may seem complex at first I have found that one quickly becomes accustomed to setting it and that the benefits obtained while climbing far outweigh any complications in the setting process. It is relatively simple to retrieve.
I have spent many years removing trees with rope systems, I would like to see more care and consideration put into the climbing anchor part of our daily rigging. Ten minutes spent carefully planning and rigging a climbers anchor has obvious benefits for safety and efficiency.
Access toward the anchor either via throwline or Alternate Lanyard Technique (ALT)
Rig MAIN LINE into rings and Knot Block
Rig WORK POSITION LINE into rings and Knot Block
Climb. Use the MAIN LINE to maintain easy access to and from the anchor. Use the WORK POSITION LINE for stability in the outer canopy.
Pre planning for retrieve. Use no more than three (approximately) natural redirects on the WORK POSITION LINE. Ensure that the MAIN LINE has a clear route between the belay device and anchor point.
Untie the bottom anchor.
Pull down the Knot Block, untie both knots and remove the WORK POSITIONING LINE. (The Standing End may need a tracer line tied to it if it is too short)
Pull on the other side of the MAIN LINE and retrieve the Ring and Ring (Cambium Saver).

1. Zelkova and Pine.

2. Zelkova and Pine.

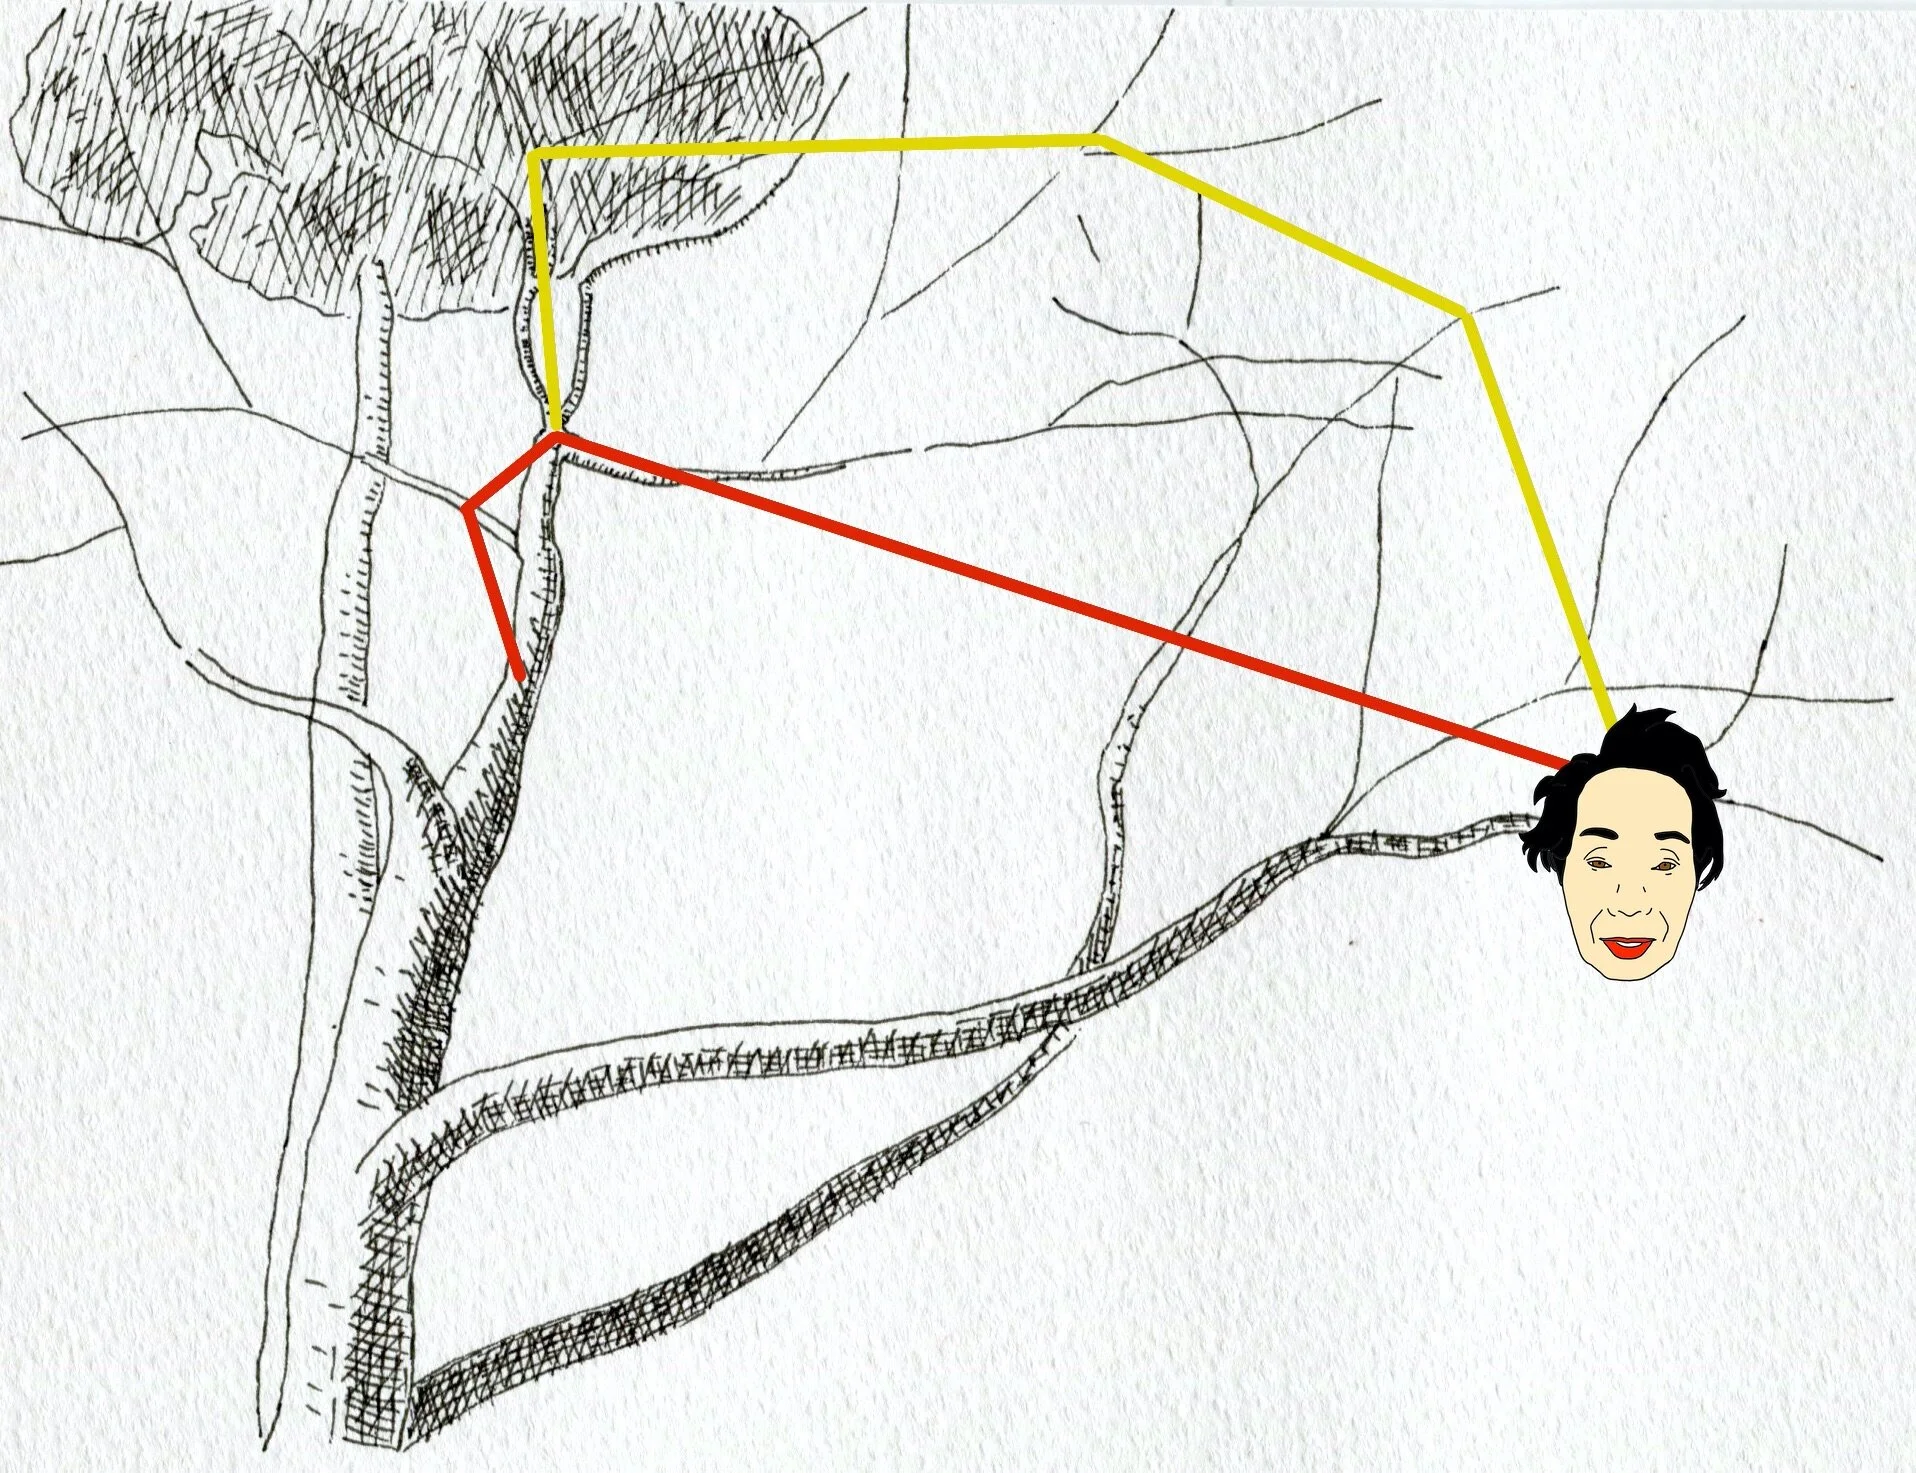
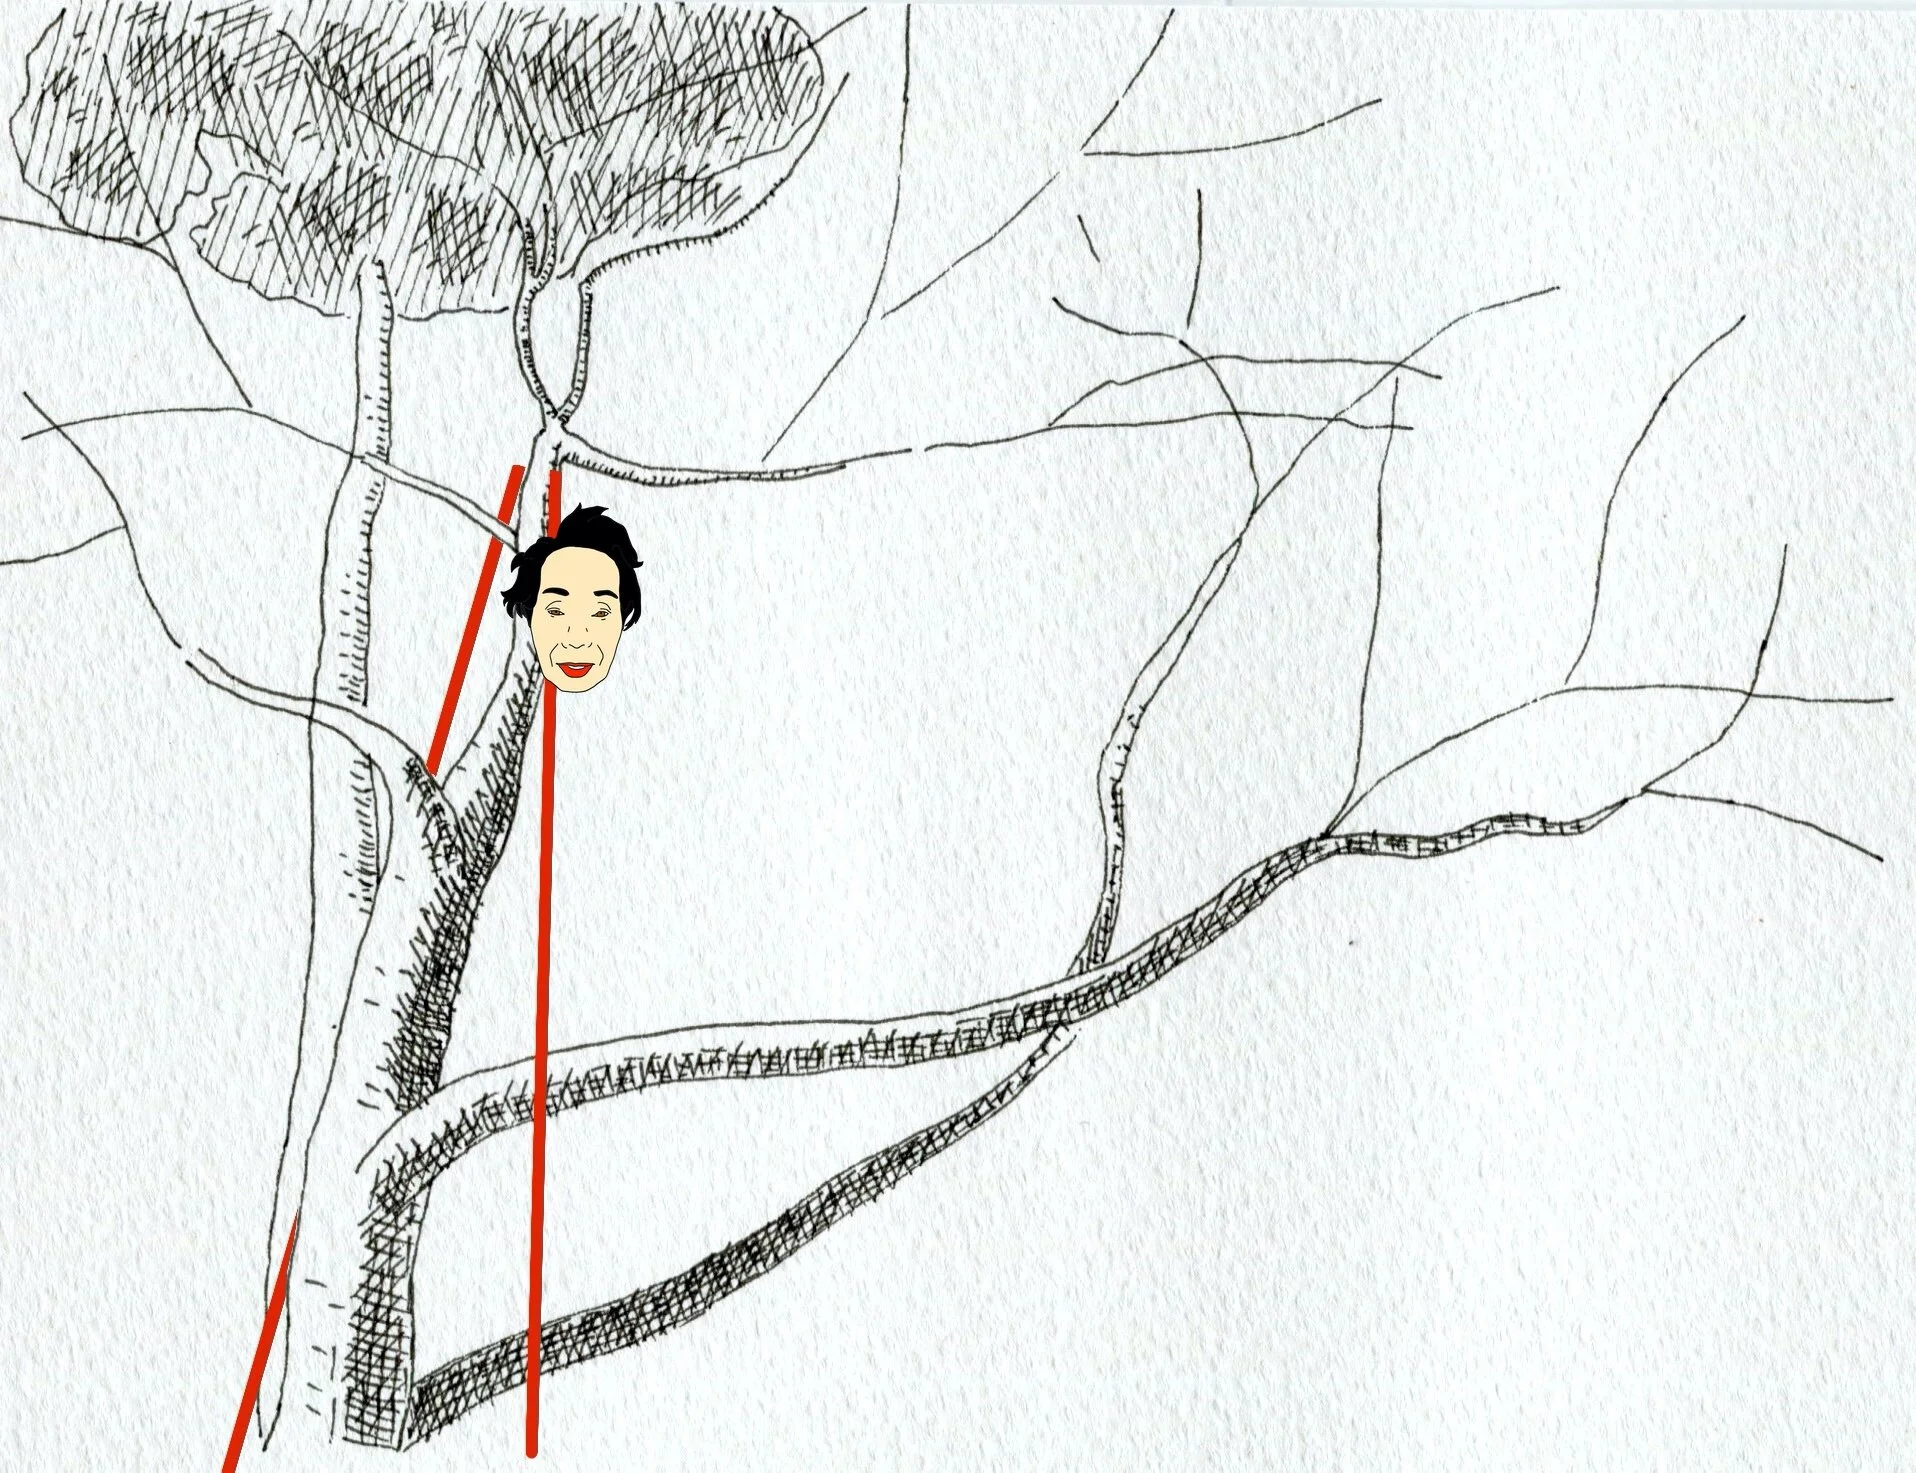
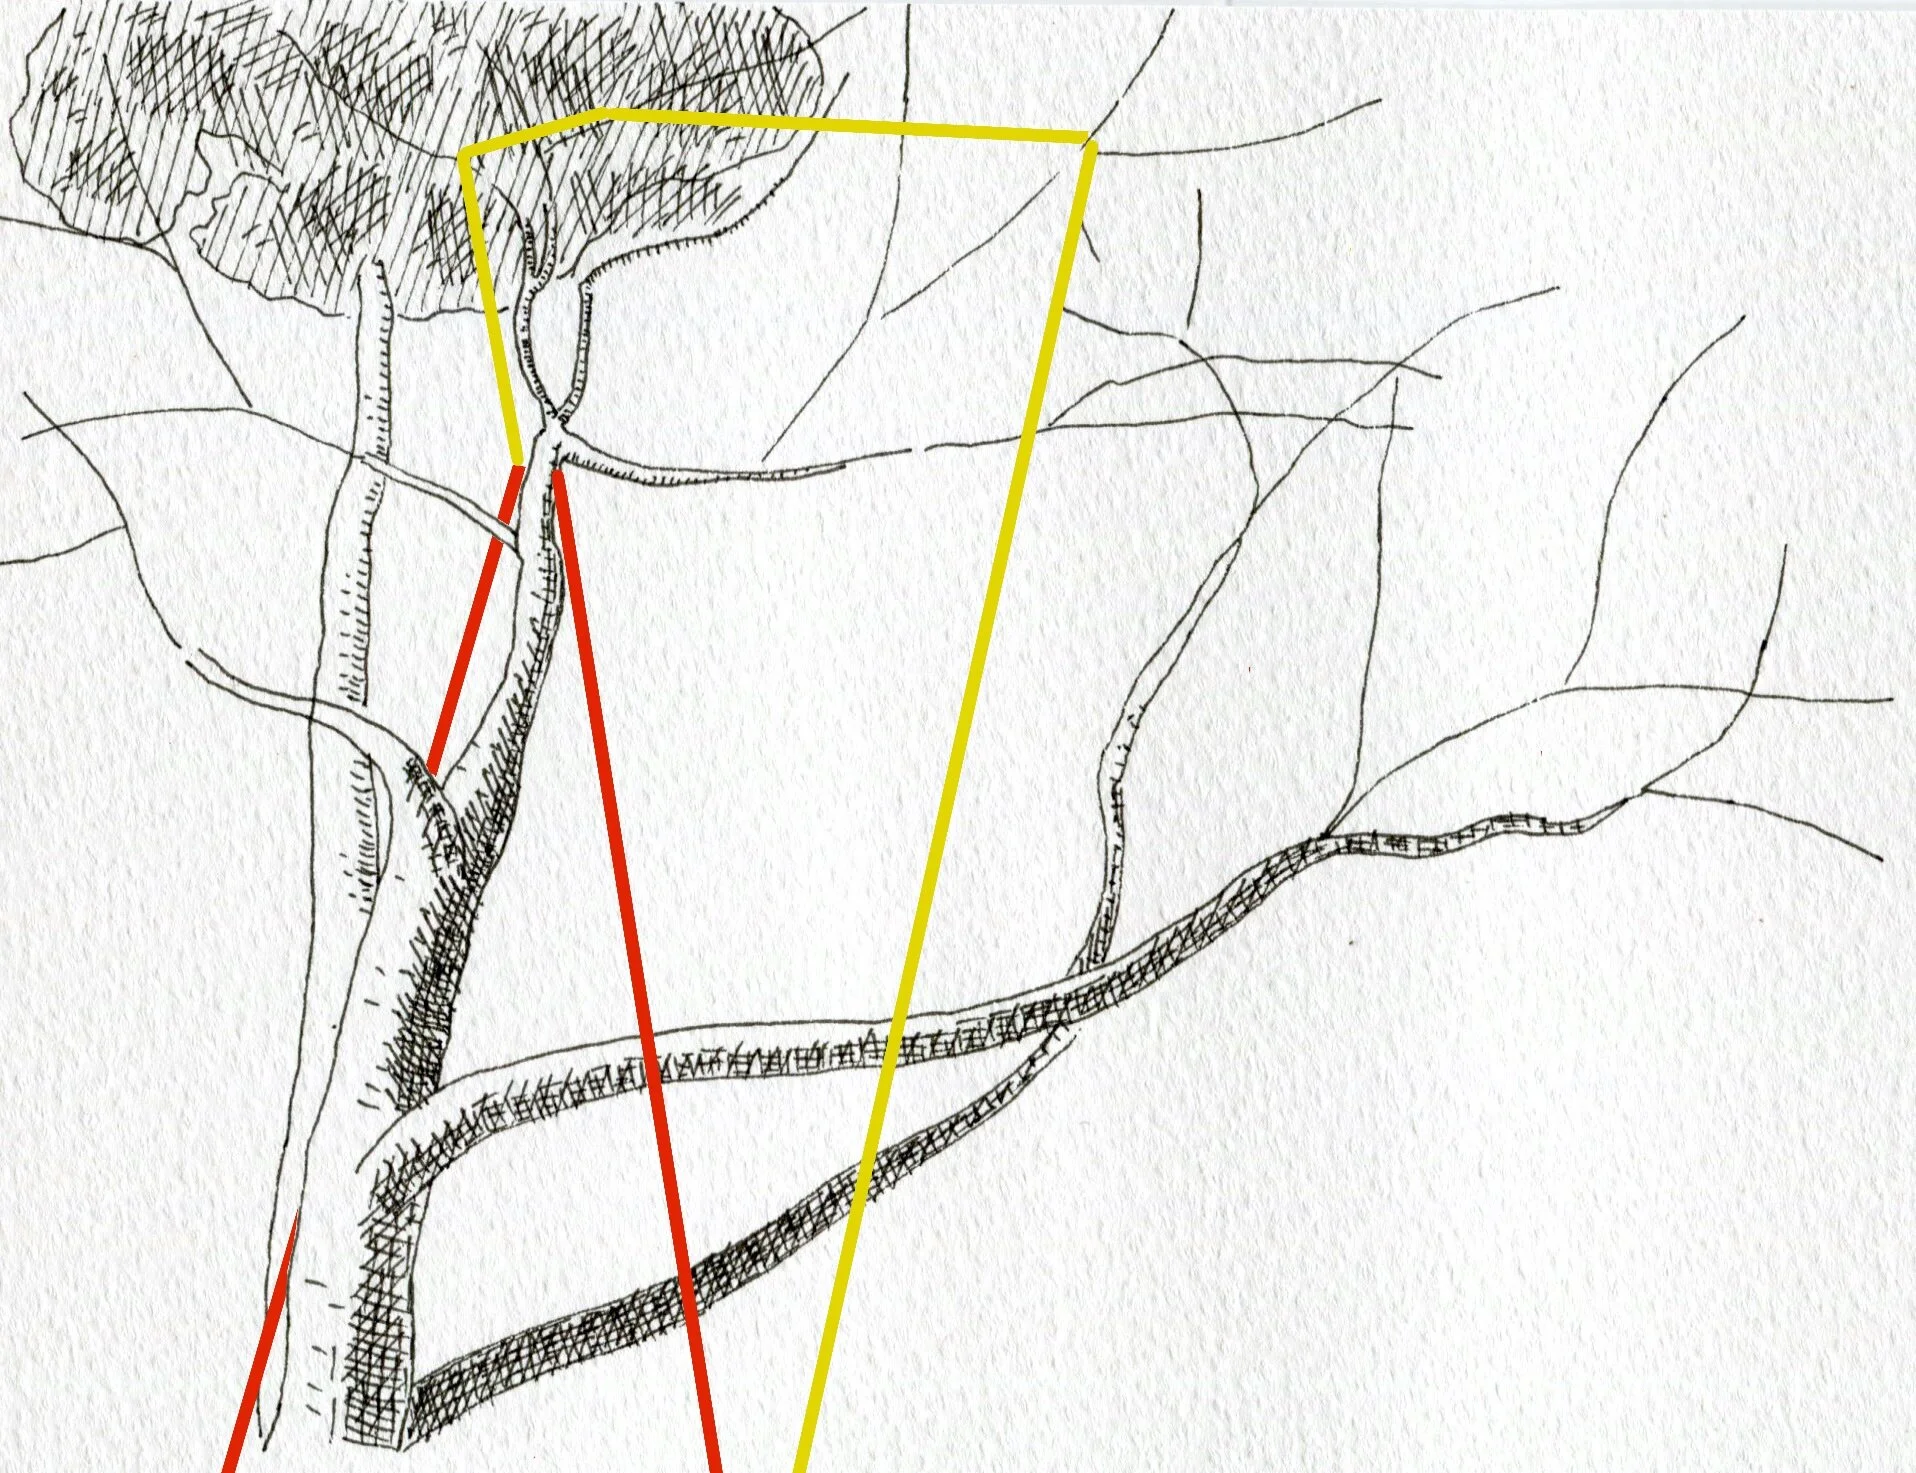
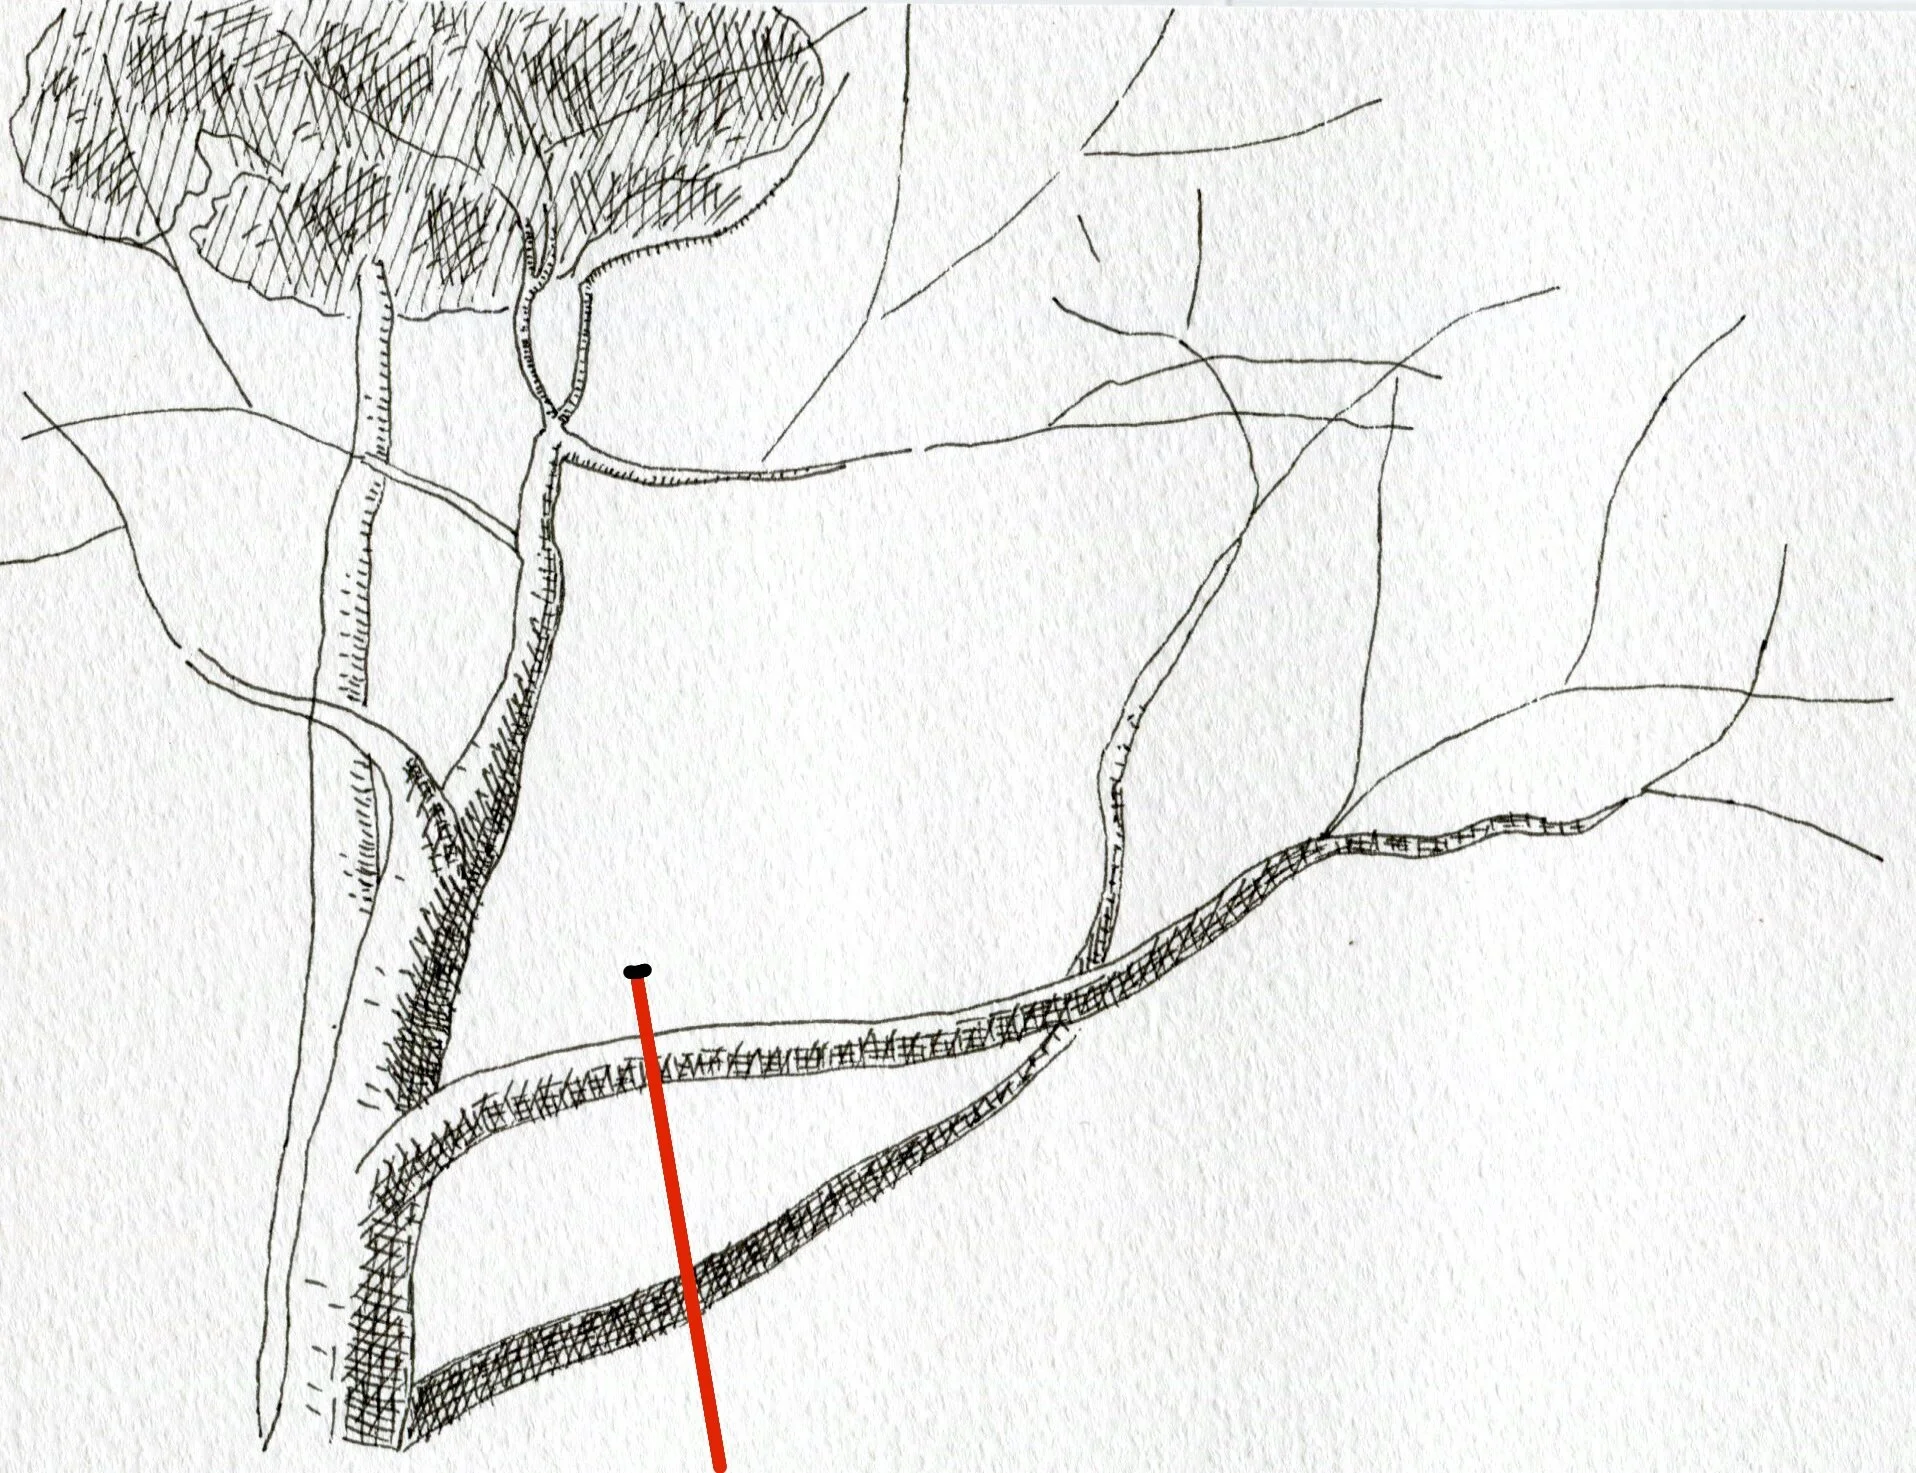
3. Access: MAIN LINE (Red) is set in a STRONG position. Note: the ‘anchor leg’ captures three distinct points in the Zelkova.
4. Rig the MAIN LINE (Red) into rings. Create a Top Anchor with Knot Block (Alpine Butterfly). The Bottom Anchor remains tied for two reasons; to back up the Top Anchor and to stop the rings from lifting upwards.

5. MAIN LINE Knot Block.

6. Pass the WORK POSITION LINE (Yellow) over higher points in the tree (A, B, C etc). Rig the Working End into the Rings and tie a Knot Block (Alpine Butterfly). Attach the two Alpine Butterfly loops together with a load bearing karabiner.
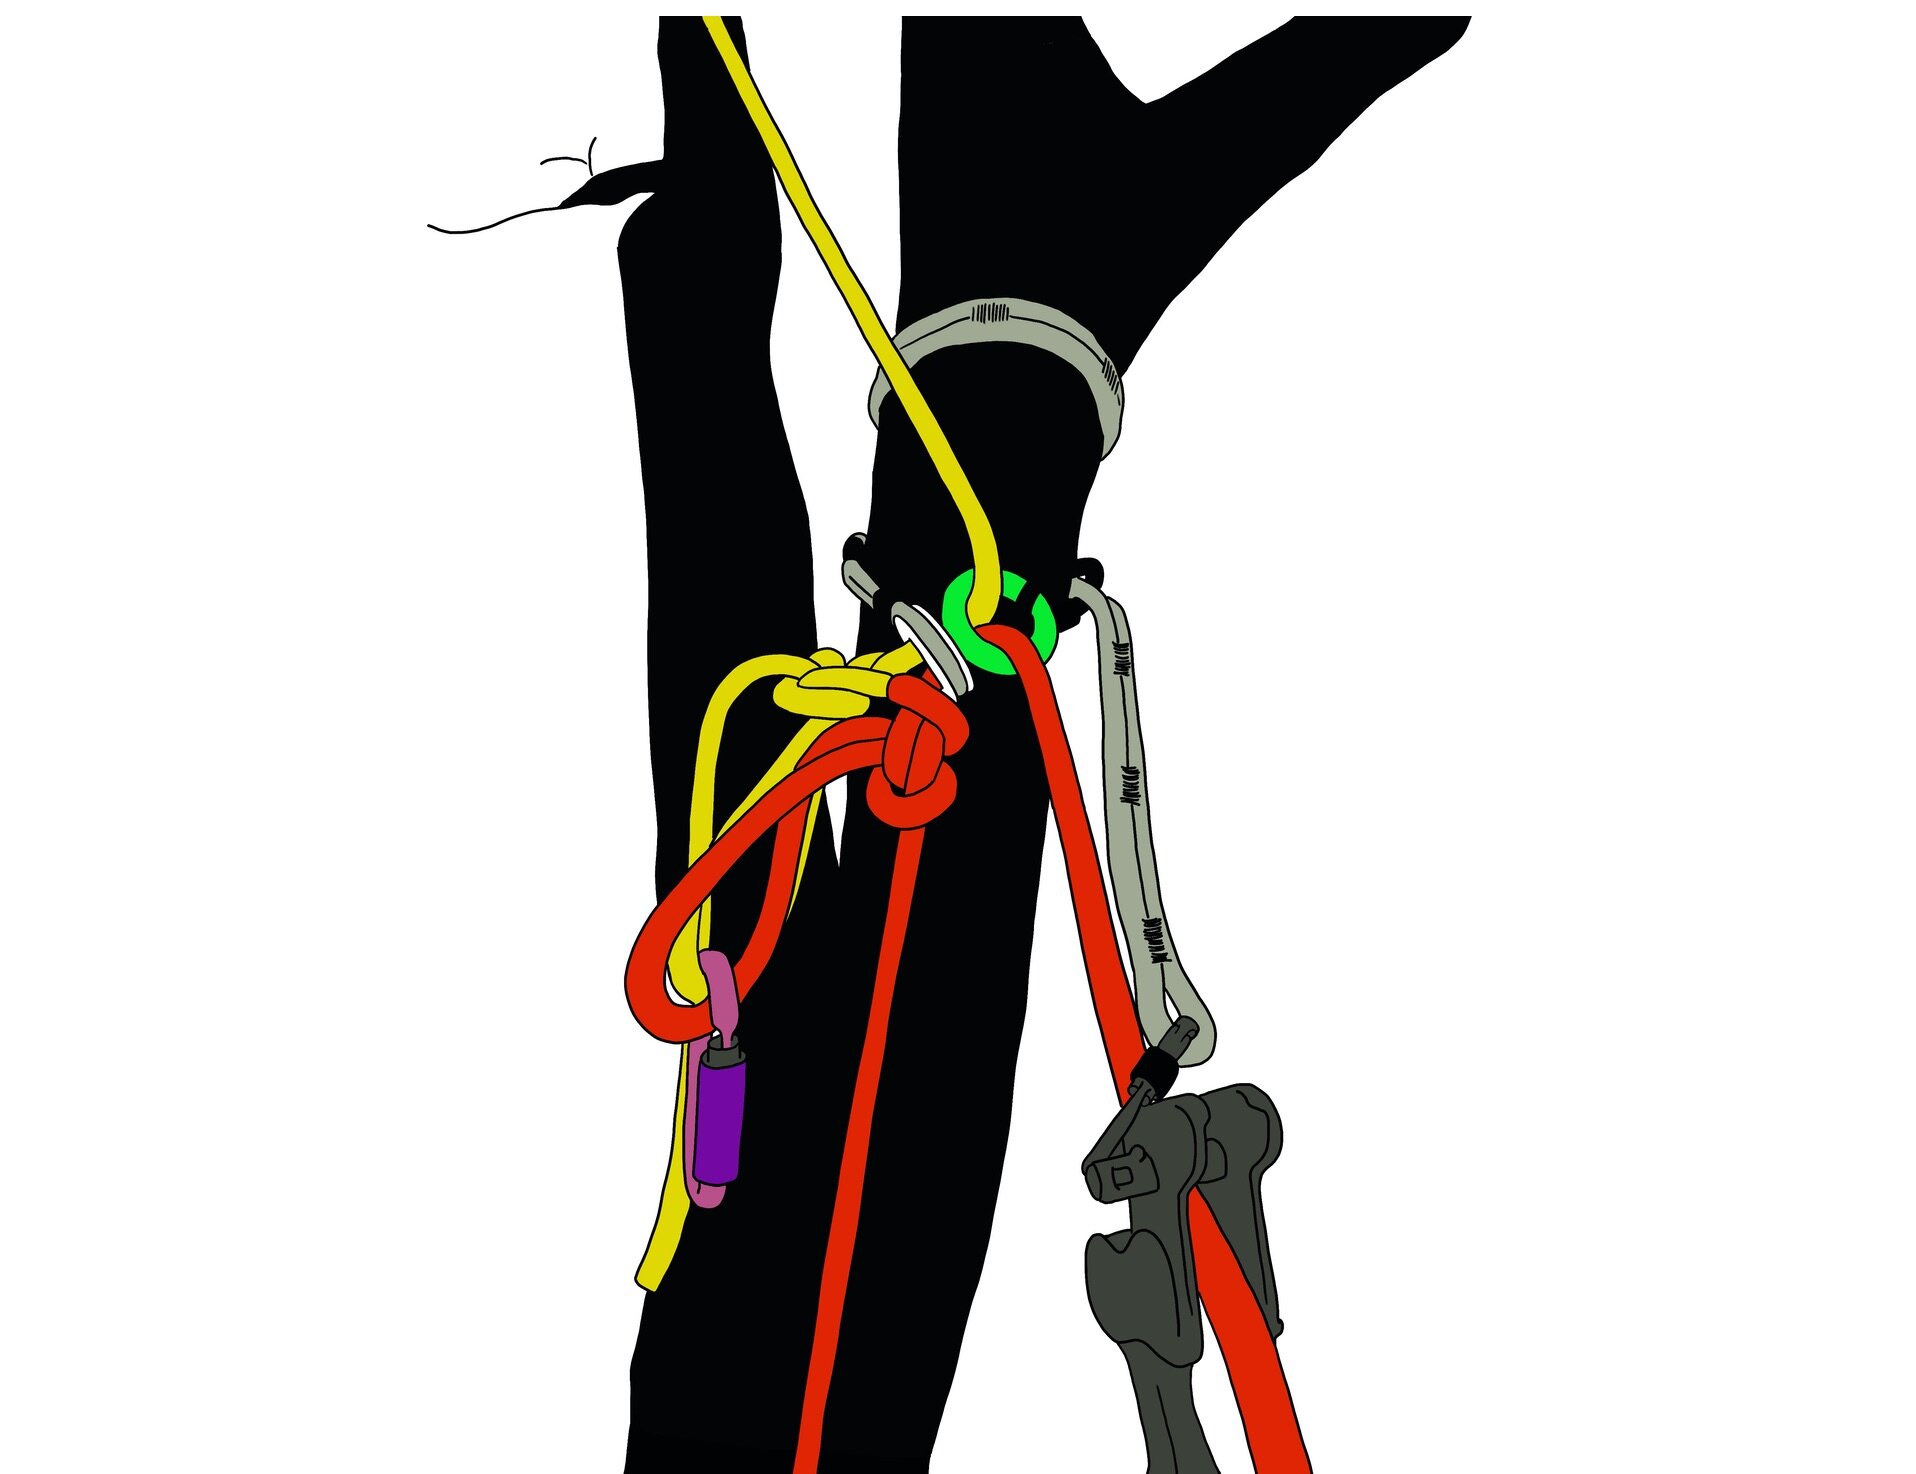
7. MAIN LINE and WORK POSITION LINE Knot Blocked through the same Ring and Ring.

8. Route planning: Pass the WORK POSITION LINE (Yellow) over natural redirects close to the work station (D).

9. Climb on the MAIN LINE (Red) toward WORK POSITION LINE (Yellow). Proceed from here on both systems.

10. When more redirects are available pass the WORK POSITION LINE (Yellow) over them. Throughout this process the climber remains fully supported on the MAIN LINE (Red). The short LANYARD is available to stabilize the climber.

11. Retreat towards anchor with a Peaceful World.

12. Peaceful World.

13. Remove belay device from the WORK POSITION LINE and retrieve it from point (E).

14. Climb toward the next work station. Etc, etc.

15. Use the opposing anchors to control movement.
16. Retrieve: descend on both lines.

17. Untie the Bottom Anchor and lower the MAIN LINE and WORK POSITION LINE’s Alpine Butterfly to ground level.

18. Untie both Alpine Butterfly’s and proceed pulling the WORK POSITION LINE and remove it completely from the tree.

19. Pull the other side of the MAIN LINE to raise the Working End (with Retrieve Ball) toward the Ring and Ring Anchor.
20. Retrieve the Ring and Ring and MAIN LINE from the tree.

21. Tree is free of equipment and damage. Climber has completed the task safely and efficiently.
Understanding the route of the ‘anchor leg’.
Passing the MAIN LINE through rings.
Setting the WORK POSITION LINE and Knot Blocking it into the Rings.
Explaining the Back Up.
Descending.
Setting a redirect with the WORK POSITION LINE.
Climbing on the redirected WORK POSITION LINE and MAIN LINE.
Passing a branch and cutting a branch.
Retrieving the MAIN and WORK POSITION LINE.
Notes
The MAIN LINE may be redirected whilst climbing but should maintain a clear path between the anchor and climber when retrieving. If not it will be difficult to remove the Ring and Ring.
If a throwline can not be used or if the anchor leg obstructs the working process, the Working End may be lifted and tied at a convenient point in the crown.
As the system is designed around the idea of a back up I recommend using a harness that has two bridges, each belay device can be attached and reattached independently.
It is up to you which belay devices are used. An interesting point is that a hitch by itself will work on the WORK POSITION LINE because the climbers weight is being shared by the MAIN LINE. Bear in mind that one is unable to descend on a hitch alone and counter friction measures must be planned.
The MAIN LINE should be twice the length from ground to anchor point. The WORK POSITION LINE may just be a single length. For example, I use a 50M and 25M line.
With this technique one tends to use the side lanyard and redirect sling less.